Can’t find an effective way on how to get video from iPhone to computer or how to transfer videos from iPhone to computer? This guide offers 3 methods to help you transfer videos from iPhone to PC or Mac with ease.
In general, you have two kinds of videos saved on your iPhone: one is imported by iTunes and the other is shot by your iPhone camera. If your iOS device is running out of space, you can copy the videos to your computer or an external hard drive to reclaim more storage space.
In this article, we are going to share with you the ways to transfer videos, photo videos/recordings from your iPhone to your PC/Mac computer. This post covers almost all possible ways that are available to copy iPhone 6/6s/7/8/X/Xs/XR/11 videos to the computer. You can go through all these methods firstly, and then choose the one you prefer to do the task.
Part 1. How to Get Videos from iPhone to PC with 3 Ways
How do I transfer videos from iPhone to Windows computer? Similar to transferring photos from iPhone to a laptop, you can do the same with video recordings. Here we will share with you 3 ways to copy iPhone videos to your Windows PC (Windows 10/8/7): with the built-in Photos app, with Windows File Explorer, and AutoPlay.
Way 1. Import iPhone Videos to PC Using AutoPlay
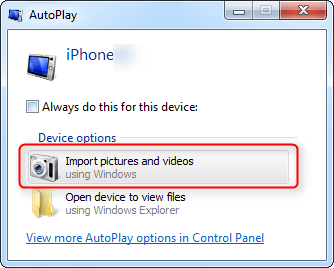
The AutoPlay feature in Windows 7 allows users to import pictures and videos from smartphones to PC. Here are steps to use AutoPlay to get videos from iPhone to computer:
- Connect your iPhone to your PC and AutoPlay will show up automatically.
- In the AutoPlay window, click on the Import pictures and videos.
- In the Import Settings, choose or create a folder to save the videos you’d like to transfer.
- Select the videos you want to import. Then click Import to get videos from your iPhone to PC.
Way 2. Import iPhone Videos to PC with Photos App
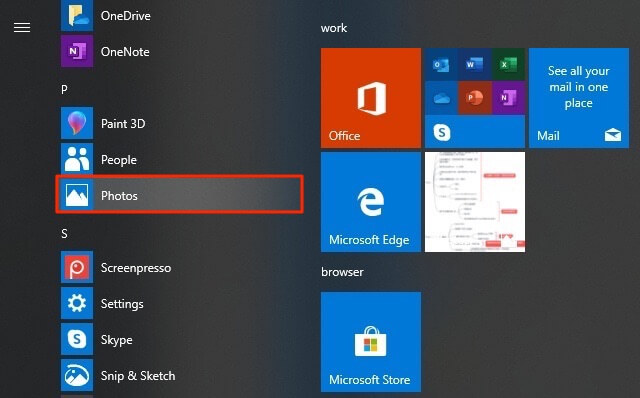
Windows 8/10 Photos app makes it quite easy to import photos and videos from your phone to your computer. Here are the detailed steps on how you can get videos from iPhone to PC with the Photos app:
- Connect your iPhone to the Windows PC via a USB cable.
- Unlock your iPhone and tap on Trust on your iPhone.
- Run Photos app from the Start menu if it doesn’t pop up.
- Under Import option select From a USB device.
- It will start searching for videos and photos on your iPhone.
- Select the photos and videos you want to transfer, and set the import destination, then click Import Selected
Way 3. Import Videos from iPhone to PC with File Explorer
Windows Explorer in Windows 7 is now called File Explorer in Windows 8/10. With the Windows Explorer, you can view and extract the photos, videos, music, and documents from your device. Follow the steps to get videos from iPhone to Windows computer:
- Connect your iPhone to PC with a USB cable.
- Open This PC and find your iPhone.
- Right-click your device name and then choose Import pictures and videos.
- For Windows 10 users: Click Start > File Explorer > This PC.
- You should see your iPhone name. Right-click it, then click Import pictures and videos.
- Choose Review, organize, and group items to import, then tap on Next to continue.
- Check the videos you want to copy to your PC and click Import to start transferring the selected videos.
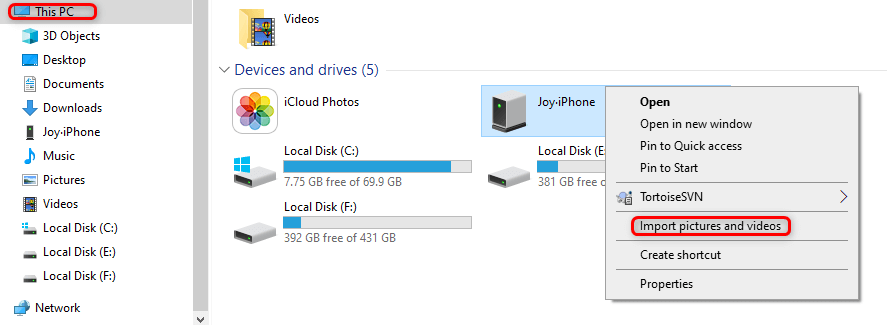
You can also do this: Go to This PC > [your iPhone name] > Internal Storage > DCIM > 100APPLE > Copy the videos from your iPhone, and then paste to your PC.
Part 2. How to Transfer Videos from iPhone to Mac Computer
In the following part, we have collected the two common ways to import iPhone videos to your Mac computer: with the Mac built-in Photos app or AirDrop. To learn more ways please read: 7 Ways to Get Photos and Videos from iPhone to Mac >
Way 1. Get Videos off iPhone with Mac Photos App
On a Mac computer, you can use the built-in iPhoto or Photos (Mac OS X 10.10.3 or later) app to import iPhone recordings (Videos taken by camera). Here we will show you how to transfer videos from iPhone to Mac computer with Photos app.
- Open Photos app on your Mac. Connect your iPhone to your Mac with a USB cable.
- Click Import > Find and select photo videos you want to import.
- Click the Import Selected option to begin the process.

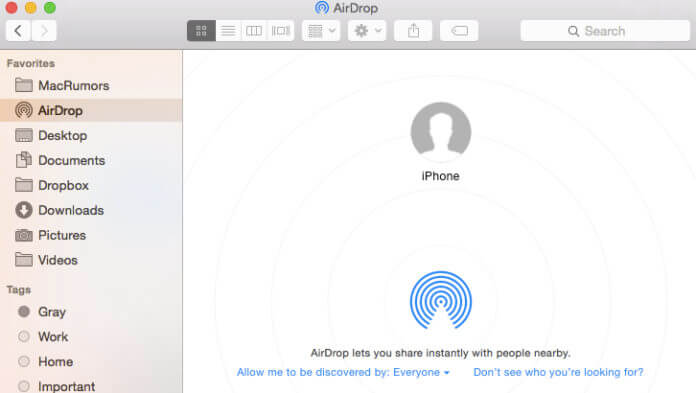
Way 2. Import iPhone Videos to Mac Using AirDrop
AirDrop is a nice function that Apple Designed for iOS users to share files like photos, videos, etc. between Apple devices. Follow the steps below to do it.
- Turn on AirDrop on your Mac: Go to Finder > Go > AirDrop > Turn on Bluetooth and WiFi to enable the AirDrop feature on your Mac > Set the option Allow to be discovered by as Everyone.
- Turn on AirDrop on your iPhone iPad iPod touch: Swipe up from the bottom of your iPhone screen to launch the Control Center > Tap on AirDrop and set your iPhone to be discovered by Everyone.
- Open Photos on your iPhone and select the videos > Tap on share button > Tap on your Mac’s name after it shows > Receive the videos on your Mac.
Part 3. How to Get Videos from iPhone to Computer Using iCloud
With Apple’s iCloud Photos feature, you can access your videos and photos from your iPhone, iPad, iPod touch, Mac, Apple TV, on iCloud.com, and your PC. If you have enabled this feature on your iOS device, the photos and videos will be automatically added to iCloud Photos. Now, let’s check the steps to import videos from your iPhone to your PC or Mac computer.
Step 1. Set up iCloud on both your iOS device and computer and signed in with the same iCloud account.
Step 2. Connect your device to a stable Wi-Fi network.
Step 3. Turn on iCloud Photos on your devices:
On your Mac, go to System Preferences > iCloud. Click the Options button next to Photos, then select iCloud Photos.
On your PC, download iCloud for Windows and follow the steps to set up iCloud Photos on your PC > Tap Done, and then click Apply. You can go to This PC> iCloud Photos > Downloads to access all the new photos from videos from your iPhone.
On your iPhone, iPad, or iPod touch, go to Settings > [your name] > iCloud > Photos, then turn on iCloud Photos.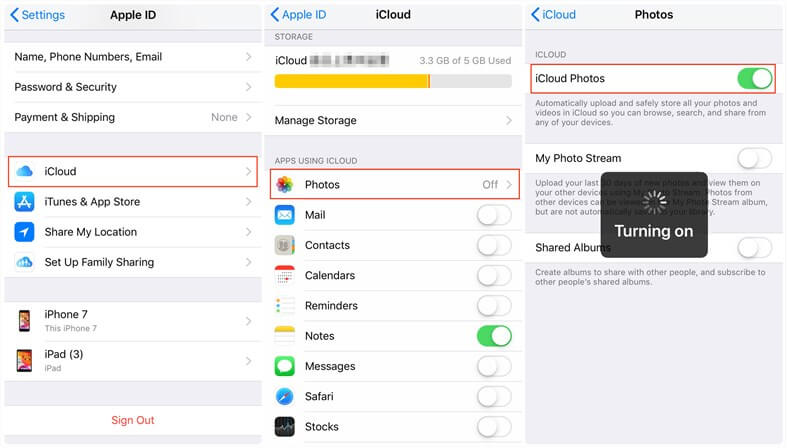
Now, all the photos and videos on your iPhone can be viewed on your Mac or PC computer. If you’ve synced photos to your iOS device from iTunes before you turn on the iCloud Photos feature, then you’ll get a message “Photos and Videos Synced from iTunes will be Removed.” In this case, the photos and videos that you synced from your computer will be deleted from your device.


